Thursday, September 30, 2010

busy as a bee

In early September the "Autumn Joy" sedum blooms are beginning to turn pink and the bees all go crazy for it. If you want to make sure you have food for the bees in your garden in early fall plant some Autumn Joy....they love it!! Both honey bees and bumble bees, butterflies and other little pollinators tooo...they all love it. On the day I took these pics I counted 36 bees...but then I stopped...there were more! Everything was a buzz.

Busy busy busy busy buuuuzzzzzybuzzzbuzzzzzzzzzzzzzzzzzzzzzbuzz!

This happy little bee's fuzz is all covered in yellow pollen..see it? Pollination in action.

Here's some more info about Autumn Joy.


Later in September the blooms get a darker more vibrant pink and are beautiful arranged in vases and vessels. I made this one for me after I made three others that were to be used as table centerpieces for a garden client's dinner party. There was still lots left for the bees....
And thinking about bees....this is a film I'd really like to see: Queen of the Sun....maybe you would too.
And since I've just discovered the video on my camera.....here's a little bit of buzz...turn your volume up.

Wednesday, September 29, 2010

apples!

Baskets full of apples are really just as decorative as flower bouquets...and maybe even more satisfying to admire at this time of year....these are "Spartans" and are so crispy and juicy right now.

'tis the season for apples and tree planting too...and there's nothing like a tree full of fruit and baskets full of it to capture my imagination and inspire me to plant another fruit tree....visions of dried apple rings, canned pie fillings, apple sauce, cider for the winter time....

A little bee in spring helping to pollinate the apple blossoms so we can have delicious apples in September and October.

The first apples we have every year come from this tree...unfortunately, I don't know the variety but they're delicious!...and when the tree blooms in the spring, it's just so beautiful.


So awesome to experience how those lovely little blooms turn into these beautiful big fruit in just a few short months...this was a delicious afternoon snack while I worked in the garden the other day.
I think perhaps I'll plant a couple pear trees next week.

Monday, September 27, 2010

saving some seeds

I felt really lucky earlier this month because I'd managed to get some of the seeds I'd been saving in the garden harvested and into the dry before the unexpected early soaker rains of this month arrived.
Ideally, I'd like to be saving so many more seeds, but for now, there's so much stuff to do so I try to keep it simple and save just the super-easy ones that almost look after themselves.

I think seed pods are one of the most fascinating things in a garden. They're beautiful and kind of captivating, really. An awe-inspiring example of nature's genius design abilities. When I look at them I can understand why artists, especially sculptors and jewellers are often inspired to recreate them in metals, clay, wood, papier mache, felt.....
check out these images...some are inspiring and fun to look at.

Here are some dried pea seeds in their pods, on the vines, waiting for me to gather them....

Kale is one of the easier seeds to save. It's amazing how many seeds are on just one plant. This is a black tuscan kale plant that I've saved to go to seed...it was planted 1 1/2 years ago! Last winter, we ate delicious flower buds from these plants. I was careful tho' to leave enough buds to form into flowers and then seeds...especially from the plants that looked the hardiest.....and now look at all these seed pods, waiting to be harvested!

I cut the stalks off near the top and drop them into paper bags (the bag helps to catch all the seeds that come out of their pods on their own) where they'll sit for a while in my garden storage area and then later in the winter, I'll sort through and separate the seeds from the pods.

These are a couple lettuce plants I left to go to seed. They're an heirloom variety called "Goldrush" and have frilly yellowy-green leaves when young...beautiful in salads.
I'm glad to be saving these seeds since I can't get this variety from my usual supplier anymore.
For folks who don't have a garden plot, this is an easy cut-and-come-again style salad plant to grow in a container on the deck and easy to let go to seed there too. You could thin the plants in the container to one or two when you're finished harvesting and let it flower and go to seed. It's a good idea to stick a bamboo pole into the pot and tie the lettuce stalk to the pole as it grows taller...this'll help it stand tall even while it gets top-heavy with all those wonderful flowers turning to seed.

The flowers blooming, close-up.

The flowers gone to seed, close-up.

Thousands and thousands of tiny seeds on one plant. So many salads. Food security. One day, I hope to be able to save many more seeds of my favourite garden plants and package them up for sale in my garden shop. Can't wait!


Saturday, September 25, 2010

zucchini blossoms

The last few days have been really good cleanup days in the garden. I've been ripping out wheelbarrow loads full of old plants that I worked so hard to cultivate just a few short months ago...and so the cycle goes....
As I cleaned up some of my summer squash and zucchini patches I was reminded of how much I've enjoyed having the tiny baby squashes and beautiful blossoms this year. The blossoms were a really fun and delicious summer time treat, stuffed and fried.


If you're growing some of your own food, this could be something fun to plan for next summer when those super abundant zucchini plants are producing....or maybe your plants still have a few blooms on them now.....

For a simple stuffing, I'll often use feta or ricotta cheese or a mixture of both, any green herbs I have in the garden...I think this pic is with basil and nasturtium leaves and some red nasturtium flower for the colour.....mix in a little olive oil....easy, yum!

Before I stuff the flower with the cheese mixture, I remove the pistil/stamen from the center.
Then I twirl the petals togather and cover it with a light tempura batter and fry. So good....another special taste of summer...seems so gourmet and yet so simple when you grow your own.

My favourite zucchini to grow for the blossoms is called "Costata Romanesco". It's helpful to know that the squash plant produces some female flowers and some male flowers. This is what a female flower looks like inside.

And a female flower has a little baby squash attached to it, like this one.

The male flower has no baby squash attached to it....

....and it looks like this inside.

When a pollinator insect, like for example, a bee comes to the squash patch, it will buzz from male to female flower, transferring pollen from the inside of the male flower to the female flower so it's little fruit will set.
Just one reason why it's so important to encourage bees in the garden! No bees, no food.
If a female flower isn't pollinated (and this has to happen during the one day that it's open) the flower will close and the little fruit on the end will wither and shrivel up. So if you see this happening on your squash plant, that's probably why and you will have to be the bee....

Lucky for me, I have lots of bees in my garden (and other pollinators too) so I have a lot of female squash blossoms with tiny zucchinis attached to use for stuffing while I also have lots to leave on the plant with the males to grow into larger zucchinis. The bees will do their work.
When you're harvesting the flowers for eating, it's really important to remember to leave enough male and female flowers on the plant for pollination and larger zucchinis, if you want some of those too!

I use more of the male flowers for stuffing and they're mostly what's available at the markets. There are usually many more male flowers than female flowers on a plant, so this works out well....in my experience, they're the first flowers to appear, too......

Here are some that I saw at a farmer's market last year. All packaged up for sale. I'm really looking forward to having these available for my customers next year!


Wednesday, September 8, 2010

cherry tomato superabundance

The sungold tomato vines that are growing in the hoophouse have been producing fruit galore these days!

They're such beautiful little things and oh so sweeeet.

I think they're best kept displayed on the table in a big bowl so that all who see them can pop one or two into their mouth as they pass by....yum, better than candy!

The red cherry tomatoes are also amazingly productive. All that I don't sell to my customers are going into the freezer to be thrown into winter slow cooker stews.....but some are being slow roasted in my toaster oven....

These are quite possibly the best tasting thing I've ever eaten!

Here's what I do: First I harvest and collect my homegrown cherry tomatoes, green and purple basil and garlic. I cut the cherry tomatoes in half and arrange on my oven pan with the cut side up.....crush garlic and place some on each tomato, a little sea salt, then chopped up basils on top of that and into oven (or toaster oven) for 4-5 hrs at 225 degrees....

Here they are just before going into the oven. Beautiful.
I'm so into these right now that I think everyone needs to go run out and pick their cherry tomatoes and do this with them, asap. Can't have a summer without this treat at least once or twice!
And if you're on Mayne Island and don't have any cherry tomatoes growing in your garden, give me a call (I have some for sale) and then make a note to self to grow some next year :-)

This is the display of my hoophouse cherry tomatoes at Happy Tides Health Foods at the Fernhill Centre. Tamara's clever "canned tomatoes" are 1/2 lb. each. They're available at Happy Tides all week long and probably next week too.....

Sunday, September 5, 2010

cardoons

The cardoons are blooming beautifully in the garden these days and the bees love them. This artichoke flower bud is not the one we're accustomed to eating...it's the midrib of the leaf that's eaten here. I've only grown these for the amazing dramatic look of the plant and for it's flowers that are lovely dried. Last year, I was lucky to get to use them in a bridal bouquet. The bride was from California, where artichokes are commonly grown and she liked the idea of having a little part of home with her as she married here on our island, far from the artichoke fields of California. It was fun to use these beauties in a bride's bouquet! Too bad I didn't take a photo.
And too bad I didn't have some cardoon when I was in San Francisco with CJR a couple years ago...they were in season!...and on the menu of a couple of the restaurants we went to. I have only tasted them once and not part of a real meal so I'm going to have to make sure that I try harvesting and using them from the garden this spring.
Here's what wikipedia has to say about Cardoon.

Friday, September 3, 2010

This year's garlic crop is all sold out. Here I am moving some from the spot where it was curing and getting it ready to sort and bag up for my customers.

I harvested the garlic back in July. Time to think about planting next year's crop now. Here are some plants after I pulled them and cleaned them up a little. They are curing on a table in my outdoor covered workshop space. This year, I spread them out on tables and put them up on some wire mesh racks that I have installed in the rafters...see my photo of the garlic curing in the rafters here. Many garlic growers hang their garlic in little bundles to cure but since I have the space, I do it this way...it seems less time consuming and works well too.

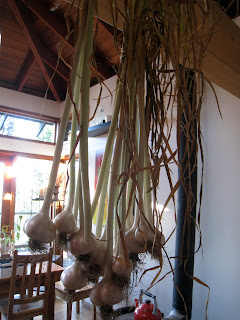
Garlic looks so lovely with it's stalks left on, bundled and hung in the kitchen....which is what I do with mine after it's cured and cleaned. It's easy to just take a clove from a bulb when you want to use some too....I've also noticed that garlic keeps over winter much better when the stalk is left on. I'm not sure why, but it works. Here it is hanging in my kitchen, waiting to be used up.

And below, all bagged up and waiting for customer pick-up. I give everyone the whole garlic plant so they can decide if they want to hang it or maybe cut the top leaves off and put it upside down in a vase (which is a fun way to display garlic in the winter!...see above link for a photo of that too)

If you're reading this and would like to pick up a bundle of garlic in a bag like this from the garden next August for 2011-12 winter eating, let me know and I'll plant some with your name on it :-)